 |
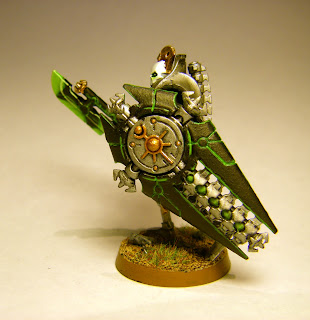
| I worked on this for so long... I will guard it with my life. |
Hey guys! So, as promised I've made my first tutorial. I decided to paint up a Necron Lychguard as I personally believe that it's an awesome model, but also because it has some fine detail that needs attending to. Just a side note, the pictures included in the tutorial aren't the best of quality, but hopefully they will be good enough to give an idea of what I'm actually doing. Also, all the paints used are from the Citadel range. With that being said, lets begin!
NOTE: Where it says "watered down", I really only put a small drop of water in. Don't water it down too much.
First up, I decided which position I would like my Lychguard to be in, so I played around with it for a little while until I found a position that appealed to me. I also added a brass grate from the 40k basing set, just for good measure.
Next I under coated my model with Chaos Black Spray.
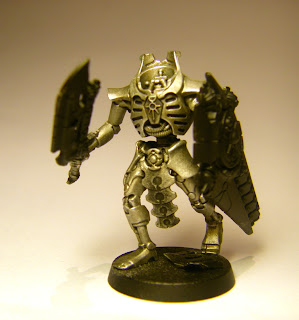
Then, using Leadbelcher I applied a heavy dry brush to all areas I wanted to be metallic metal, this was then followed up with a lighter dry brush of Ironbreaker. To create an underlying tone of rust, I applied a wash of watered down Null Oil about a 1:1 ratio. Once dry, I applied a watered down wash of Agrax Earthshade, again about a 1:1 ratio.
Now, with the initial base coating out of the way, it's time to move onto the highlighting! I then reached for Ironbreaker again and applied a light dry brush over the metallic areas. (Be cautious not to apply too much Ironbreaker, as you may spoil the 'rusty' effect. Start slowly and lightly to avoid any mishaps.)
Next, I went for Runefang Steel and with a finer brush applied generous highlights to areas where the light would hit the most. Mainly being the corners and edges.
With the main part of the body all done, it was time to move onto painting the gold. I started with a base coat of slightly watered down Hashut Copper. This was followed by a layer of Gehenna's Gold.
I then applied a wash of Agrax Earthshade over the whole gold area. Once dry, I applied another coat of Gehenna's Gold, but made sure to leave the wash in the recesses. To finish it off, I sparingly highlighted the edges with a 1:1 mix of Gehenna's Gold and Runefang Steel.
With the gold also out of the way, I decided to start work on the Dispersion Shield. The metal and gold were painted in the same way as mentioned above. Because the undercoat of Chaos Black was a reasonably smooth coat, I decided to leave it and not bother painting a layer of black over it. I then moved on to painting the green lighting effects on the edges of the shield.
This was done using a watered down layer of Warpstone Glow nearly all the way around the edges. To make it look a little more effective, I applied a watered down layer of Moot Green on some of the edges. The ovals between the metal were painted again using Warpstone Glow and Moot Green and were also applied in the same order. I even added a touch of White Scar to the Moot Green, just to make it stand out a little more.
Now, moving onto the sword: this was a little bit tricky. The gold was painted in the same manner as mentioned before. Again, leaving the black from the undercoat I went straight to painting the green power effects on the blade. Using a watered down Moot Green, apply irregular shapes onto the blade focusing more towards the edges. Then, using Warpstone Glow, apply a layer on the outskirts of the irregular shapes. This will be your base coat to work with when you start to blend the paint together.
To achieve this blending effect, I used a very watered down Moot Green and applied numerous layers, each time trying to create a smooth transition between the two colours. (It is important to note, not to rush this process or else you risk ruining the effect. Wait for each layer to dry until applying the next. It may take a while, but the overall effect will be well worth it!) For extreme highlights, I used a 1:2 mix of Moot Green and White Scar which was applied on the very edges of the blade to finish it off nicely.
The green light effects on the rod and in the grooves of the blade were painted using Warpstone Glow followed by Moot Green, both of which were watered down.
Last but not least, the Lychguard's head! Unfortunately I could not get any close up shots of the head as they always came up blurry! But it is still visible in the full body shots I took. So I decided to paint the main part of the head first and leave the gold decoration until last. The white was first painted using a base coat of Ceramite White, I then used White Scar with a tiny drop of Fenrisian Grey and watered it down. I did two layers of this mixture to make it nice and smooth. I then highlighted the edges of the face with pure White Scar. The gold was again painted in the same manner as mentioned above.
The eyes were painted starting with a layer of Warpstone Green. This was followed by Moot Green, and then mix of Moot Green and White Scar that was applied directly onto the centre of the eye. To create a glowing effect, a very watered down Moot Green was used as a glaze just under the eye.
 |
| Final Product |
 |
 |
 |
 |
| Ready to stomp Zero. |
To finalise the Lychguard I picked out his chest glyph and orb using Moot Green. I then based the model to give it some extra detail. So there you have it! One Lychguard armed and ready for battle. I hope this tutorial was of some use to you and please, if you have any comments or questions do not hesitate! Thanks.


Hey, looks good! Maybe you should try some chipping on some of that metal. It would be sexy!
ReplyDeleteThanks man! Yeah chipping on the metal would look pretty sweet, might go ahead and do it. Cheers
Delete